Hook System: An 8-Extension-Point Plugin Mechanism
An agent’s core loop is fixed – the ReAct loop repeatedly executes “reasoning → action → observation.” But at each key node in the loop, we often need to insert “side actions”: logging, reporting metrics, auditing tool calls, automatically injecting steering information, intercepting dangerous commands…
If all these side actions are hardcoded into the agent loop, what happens? The loop body becomes polluted with various if-branches and optional callbacks. Anyone reading the code can’t tell what’s core logic and what’s an add-on feature. Worse, every new side action requires modifying the agent loop – the more people modify it, the more brittle the loop becomes, and the more hesitant people are to touch it.
The Hook system was born to solve this contradiction: the loop stays pure; side actions are inserted through extension points. This article starts with the fundamental questions of hook design, compares the trade-offs of three extension approaches, and finally dives into how aptbot leverages 8 hook points.
1. Concepts: What is a Hook, and Why Do We Need a Hook System
1.1 Definition of a Hook
A hook is a common extension pattern in software engineering. It reserves “insertion points” at key positions in the main flow, allowing external code to execute custom logic at specific moments without modifying the main flow.
Analogy: A restaurant kitchen has an assembly line – wash → cut → cook → plate. If you want to add a “garnish” step before “plate,” you don’t need to tear down and redesign the entire assembly line. You just insert a “garnish station” between “cook” and “plate.” That “insertion point” is a hook.
In an agent system, hooks play a similar role: the agent loop is the assembly line, hooks are the slots reserved on the assembly line, and users can plug their own code into these slots to execute at specific moments.
1.2 Difference Between Hook, Skill, and Tool
In aptbot’s three-layer extension system, the three have distinctly different roles:
- Tool: The basic operations the agent uses to “do things.” Reading files, executing commands, searching the web – these are the atomic units of the agent’s action capability.
- Skill: Knowledge that tells the agent “how to use tools to do things.” For example, “how to debug TypeScript errors” is a skill that guides the agent through steps using read, edit, run, and other tools.
- Hook: Custom logic that developers insert at specific moments in the agent loop. It’s not invoked by the agent, but by the agent framework. Hooks do not participate in the agent’s decision-making process; they execute in the “gaps” of the decision process.
To summarize in one sentence: Tools are the agent’s “hands,” Skills are the agent’s “knowledge,” and Hooks are the developer’s “interface” to intervene in the agent loop.
1.3 Why Not Just Build All Side Actions In
Some projects choose to “build all side actions in” – the agent loop comes with built-in logging, monitoring, auditing, rate limiting… everything is in the loop body itself.
This approach works at small scale, but as features grow, it faces three problems:
- Loop bloat: Each “kind of useful” side action adds a few lines to the loop. A 300-line loop balloons to 1000 lines, and the core ReAct logic drowns in incidental code. New team members spend significant time figuring out “what’s core and what’s optional.”
- Hard to disable: User doesn’t want a certain side action? Either they can’t turn it off (it’s hardcoded), or they add a switch (
if (config.enableAudit) { ... }), and the loop accumulates more and more condition branches. Each condition branch adds a test path – code coverage might show 100%, but effective combinatorial testing is nearly zero. - Limited customization: What if the user’s logging format differs from the project’s built-in format? What if they want to attach custom tags when reporting metrics? If side actions are built-in, users can only “accept or abandon,” not customize.
The Hook system extracts “optional side actions” from the loop, letting the loop keep only “essential core logic” while side actions are plugged in via hooks. This solves the three problems of loop bloat, hard-to-disable, and limited customization.
2. General Design Approaches: Common Patterns for Extending the Agent Loop
There are several common design patterns for inserting side actions into the agent loop. Understanding these patterns is the foundation for analyzing specific approaches.
2.1 Criteria for Selecting Extension Points
A good extension system needs to answer four questions:
- Where to insert: Which moments provide extension points? Too few (only start/end) isn’t enough; too many (every line of code) is over-engineering.
- How to execute: Synchronous or asynchronous? Serial or parallel? Can it block the main flow?
- How to communicate: Can hooks exchange data? Can hooks modify the main flow’s state?
- How to manage: When multiple hooks register at the same point, how is the execution order determined? How are hooks discovered and loaded?
Different answers to these four questions constitute different design approaches.
2.2 Granularity of Extension Points
The granularity of extension points is a trade-off. Coarser granularity (only providing extension points at agent startup and shutdown) is simpler to implement, but limits what you can do – you can’t intercept and modify parameters before a tool executes. Finer granularity (providing extension points before and after every function call) offers maximum flexibility but dramatically increases implementation complexity, and most extension points may never be used.
The most common practice is to divide extension points according to the natural layers of the agent loop. The agent loop naturally has four layers: the entire agent lifecycle, each user turn, each LLM call, and each tool call. Each layer is further divided into before/after moments, giving a total of 8 points. This is not a coincidence – it’s determined by the essential structure of the agent loop.
2.3 Design Space of Execution Models
The execution model has three key dimensions:
Synchronous vs Asynchronous: Synchronous execution means the main flow waits for the hook to complete. The advantage is predictable behavior (the hook’s results are immediately visible); the disadvantage is that hooks cannot perform time-consuming operations. Asynchronous execution lets the main flow continue while the hook completes in the background. The advantage is better performance; the disadvantage is that hook results may “arrive late” – by the time the hook finishes, the main flow has already moved to the next stage, and the opportunity to modify state has passed.
Serial vs Parallel: Serial execution guarantees hook order, suitable for scenarios requiring chained data passing. Parallel execution has better performance but cannot guarantee data dependencies between hooks.
Blocking vs Non-blocking: A blocking hook can stop the main flow from continuing (e.g., in tool_before, “this tool cannot execute, return an error”). A non-blocking hook can only “observe” but not “interfere.”
These dimensions combine into different execution models, each suited to different use cases.
2.4 Plugin Discovery and Loading
Once extension points are defined, how are hook code discovered and loaded? Common approaches include:
- Configuration registration: Explicitly declare which hooks are enabled in a configuration file. Most controllable, but every new hook requires modifying the config.
- Directory scanning: Agree on a directory, place all hook files in it, and the system automatically scans and registers them. Most frictionless, but users may not know which hooks the system has loaded.
- Decorator/Annotation: Use decorators in code to mark hook functions, and the system discovers them through reflection. Has requirements for the type system.
Each approach has its applicable scenarios, and none is absolutely superior.
3. Comparison of Hook/Extension Approaches in Practice
With an understanding of the design space for extension systems, let’s look at three representative approaches. They represent three different technical paths: “no extension,” “asynchronous extension,” and “synchronous extension.”
3.1 Approach A: No Hook System, Side Actions Hardcoded
The choice here is to “simply not build an extension system” – all side actions are directly hardcoded into the agent loop. Need logging? Add a log() call in the agent loop. Need monitoring? Add a metric() call before and after each LLM call. Need auditing? Add an audit() call before and after each tool call.
Design Characteristics:
- Zero abstraction: No hook interface, no extension points, no plugin directory. Side actions are just ordinary function calls.
- All built-in: All side actions that “someone might need” are written in the loop, controlled by configuration switches.
- Change means modify the loop: Any addition, modification, or removal of a side action directly modifies the agent loop’s core code.
Advantages:
- Simplest to implement – no need to design an extension API or implement a plugin loader
- Most transparent – all side actions are in the loop; reading the loop code shows everything
- Easiest to debug – no need to trace hook call chains; side actions and main flow are together
Disadvantages:
- Poor extensibility: Every new side action requires modifying the core loop. The loop maintainer becomes the bottleneck – if an agent project has 10 users, each wanting a different side action, the loop balloons to an unmaintainable size.
- High customization cost: Users want a different logging format? They have to fork the agent loop. This means they can’t follow upstream updates – upstream fixes a bug, but the forked version has already changed the loop structure, and merge conflicts are inevitable.
- Incomplete disabling: A config switch can “disable” a side action, but the condition branch still exists. In extreme cases, each condition branch requires additional test coverage.
Applicable scenarios: Minimalist agents (core loop 100-150 lines,with almost no side action requirements), teaching demos (showing the agent loop itself, no extension capability needed).
3.2 Approach B: Event Emit with Asynchronous Listening
This approach works as follows: the agent loop “emits” events at key moments, and external listeners asynchronously receive and process them. Event listeners and the agent loop run in different event loops without blocking each other.
Design Characteristics:
- Event-driven: The agent loop triggers events at specific moments (e.g.,
"llm:before","tool:after") and continues execution without waiting for listeners to finish. - Asynchronous non-blocking: Listeners run in an independent event loop. Even if a listener takes a long time (e.g., writing to a remote database), the agent loop is unaffected.
- One-to-many: Multiple listeners can subscribe to the same event. Logging, monitoring, and auditing each independently subscribe to the events they care about.
- No return value: Event listeners are “fire-and-forget” – they don’t return any value to the agent loop and cannot modify the main flow’s state.
Advantages:
- Good performance – the agent loop doesn’t need to wait for hooks to complete; hooks run in the background in parallel
- Strong isolation – hook errors don’t affect the main flow (async errors are typically swallowed or written to error logs)
- Easy to add – just
on("llm:after", handler)in any code, no need to modify the loop
Disadvantages:
- Cannot guarantee order consistency: This is the most fundamental problem. Suppose two hooks: hook A (logging) and hook B (modifying LLM response content). If both hooks listen to the
llm_afterevent, due to asynchronous execution, there’s no guarantee that hook A sees “before modification” or “after modification” content before hook B. Worse, the agent loop may enter the next round of reasoning before hooks finish processing – the agent makes decisions based on “old” state while hooks process “new” data, creating a disconnect. - Cannot block the main flow: Event listeners cannot say “this tool call is invalid, don’t execute it.” Even if a
tool_beforelistener detects dangerous parameters, it can only log a warning but cannot prevent tool execution. - Difficult state synchronization: If a hook needs to modify the agent loop’s state (e.g., injecting steering into the system prompt), it cannot be done safely under the async model – the modification happens after the agent loop has moved to the next stage.
Applicable scenarios: Scenarios with no ordering requirements for side effects (pure log collection, pure metric reporting), end-to-end systems sensitive to main flow performance.
3.3 Approach C: Synchronous Hook Chain Injection
This approach chooses to “synchronously execute a hook chain at key nodes of the main flow” – hooks are synchronous functions that return an optionally modified context, with each hook building on the previous one.
Design Characteristics:
- Synchronous execution: Hook functions must return synchronously (or return a Promise that the main flow awaits). The main flow continues only after all hooks have completed.
- Chained passing: Each hook receives the current context, can optionally modify it and pass it to the next hook. The result from the last hook affects the main flow.
- Priority ordering: Multiple hooks can register at the same extension point, with execution order controlled by a priority field.
- Can block: Hooks can return a “stop” signal to block the main flow (e.g., “tool call parameters are invalid, refuse to execute”).
Advantages:
- Order consistency: Hook execution order is fully controllable; each hook sees the modifications made by previous hooks. The agent loop continues only after all hooks complete, so there’s no “state disconnect.”
- Can modify the main flow: Hooks can modify any field in the context – for example, injecting additional system prompt content in
llm_before, and the agent loop will use the modified content when calling the LLM. - Can block the main flow: A
tool_beforehook can reject illegal tool calls and return a custom error message; the agent loop will pass this error to the LLM instead of actually executing the tool. - Predictable behavior: Given a set of hooks and input, the execution result is fully deterministic. Debugging only requires tracing the hook chain’s execution path.
Disadvantages:
- All hooks must be lightweight and fast – any hook that takes too long will slow down the entire agent loop
- The synchronous model is not friendly to “background tasks” (e.g., remote log reporting); hooks need to fire-and-forget on their own
- Error handling in the hook chain requires care: when a hook throws an error, the system needs to decide whether to “skip it,” “terminate the entire chain,” or “swallow it and continue”
Applicable scenarios: Projects requiring precise control over hook order and data (auditing, steering injection, parameter validation), projects with controllable scale.
3.4 Comparison of Three Approaches
| Dimension | Approach A (No Hook System) | Approach B (Async Event Emit) | Approach C (Sync Hook Chain Injection) |
|---|---|---|---|
| Core philosophy | Side actions built-in, zero abstraction | Events emitted, async processing | Sync chain injection at key nodes |
| Execution model | Sync (mixed with main flow) | Async (independent event loop) | Sync (main flow waits) |
| Can modify main flow | Yes (directly modify loop code) | No (listeners have no return value) | Yes (mutate context) |
| Can block main flow | Yes (condition branches) | No | Yes (return block signal) |
| Hook order control | N/A (code order) | Cannot guarantee | Priority sorting |
| Performance impact | Low (direct calls) | Very low (async non-blocking) | Medium (sync waiting) |
| Implementation complexity | Low | Medium (needs event bus) | Medium-High (needs hook manager) |
| Customizability | Poor (must modify core code) | Good (external listeners) | Good (pluggable hooks) |
| Debug difficulty | Low | High (async tracing is hard) | Medium (serial tracing possible) |
None of the three approaches is absolutely superior. Approach A suits minimalist teaching projects, Approach B suits online services with extreme performance requirements, and Approach C suits projects needing precise control over extension behavior. Which path to choose depends on the project’s core requirements.
4. aptbot’s Design Features
aptbot chose Approach C – Synchronous Hook Chain Injection, with three customizations on top: the topology of 8 hook points, a two-layer plugin directory loading strategy, and a sandbox-free design philosophy.
4.1 8 Hook Point Topology: Natural Convergence of Agent Loop’s 4 Layers × Before/After
aptbot sets up 8 hook points in the agent loop, grouped into four layers according to the loop’s natural hierarchy:
Agent Level (entire agent lifecycle)
agent_before: Triggered when the agent starts. Suitable for global initialization (e.g., loading external config, establishing database connections).agent_after: Triggered when the agent exits. Suitable for global cleanup (e.g., closing connection pools, writing final state).
Turn Level (each user turn)
turn_before: Triggered before each round of user interaction begins. Can modify this turn’s initial context (e.g., injecting a “it’s after work hours, suggest brief answers” prompt based on current time).turn_after: Triggered after each round of interaction ends. Can observe this turn’s final state (e.g., recording this turn’s duration, organizing key information into long-term memory).
LLM Level (each LLM call)
llm_before: Triggered before calling the LLM. Can modify inputs like messages, tools, systemPrompt (e.g., automatically injecting project-specific code conventions).llm_after: Triggered after the LLM returns a result. Can observe LLM output, perform post-processing (e.g., detecting if sensitive content was triggered).
Tool Level (each tool call)
tool_before: Triggered before tool execution. Can intercept illegal calls, modify call parameters (e.g., automatically adding a timeout limit to bash commands).tool_after: Triggered after tool execution. Can modify return values, record audit logs (e.g., redacting tool output containing sensitive information).
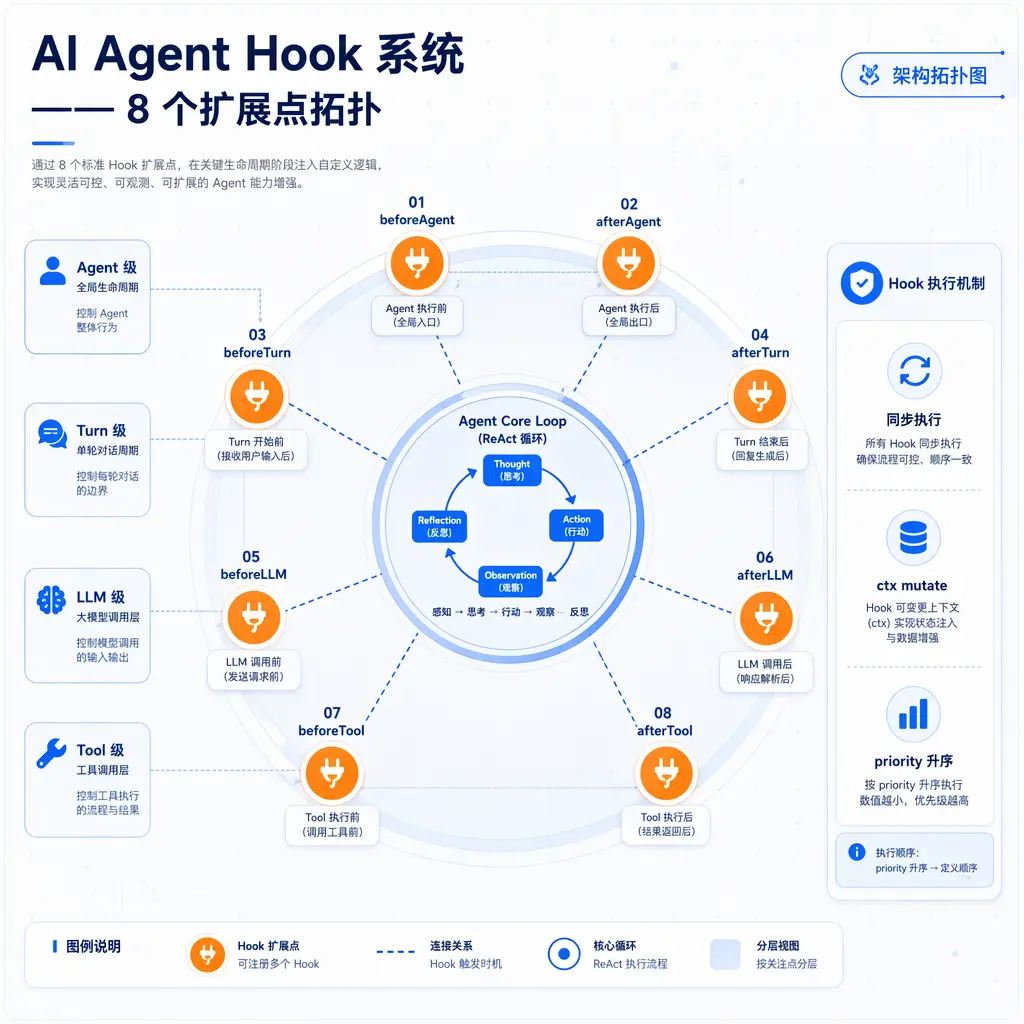
The design of these 8 points is not arbitrary. If you draw out the agent loop, it naturally has four layers of boundaries: agent start/stop, each turn’s start/end, each LLM call before/after, and each tool call before/after. Each layer boundary has two moments (before/after), so 4 × 2 = 8, exactly 8 points.
This is not a coincidence. Any well-designed agent framework, if it tries to provide reasonable extension points in the loop, will eventually converge to a similar 8-point topology. The structure of an agent loop is finite – it must handle lifecycle, conversation turns, reasoning invocations, and action execution. The boundaries of these four layers are the optimal positions for extension points.
Compared to Approach B’s “events emitted arbitrarily” (events can be emitted at any code location, and listeners must filter themselves), aptbot’s 8-point topology provides structurally clear extension positions – each hook point has a well-defined semantics (what moment is this, what can I do here). When a user sees llm_before, they know it’s triggered before the LLM call and they can modify the system prompt.
4.2 Synchronous Execution + ctx Mutate Chain Passing + Priority Ascending
Multiple hooks may register at the same extension point (e.g., two hooks both register for llm_before, one for injecting steering, one for injecting project conventions). aptbot’s execution model ensures they collaborate in an orderly and predictable manner:
Synchronous execution: All hooks are synchronous functions (or return Promises that are awaited). The agent loop will not enter the LLM call phase until all llm_before hooks have completed. This guarantees that “what the hook says it modified is really modified” – there’s no race condition where the LLM is already called before a hook finishes.
The cost of synchronous execution is that hooks cannot do heavy work. If a hook needs to send an HTTP request to report data, it should fire-and-forget (initiate the HTTP request but not await it, letting the request complete in the background), not blocking the hook chain. aptbot’s sync model requires hook authors to have a clear judgment about “what should be done synchronously and what can be done asynchronously.”
ctx mutate chain passing: Each hook receives a context object (containing all relevant data for the current execution phase) and can directly mutate it. Each subsequent hook sees the context as modified by the previous hook.
A concrete example: Suppose there are two llm_before hooks – hook A injects “Current time: 2026-07-02” into the system prompt, and hook B injects “Project convention: use pnpm as the package manager.” The execution flow is:
- Agent loop constructs the initial context with an empty system prompt
- Hook A executes, appending time info to context.systemPrompt
- Hook B executes, seeing that context.systemPrompt already contains time info, and appends the project convention on top
- Agent loop uses the final systemPrompt to call the LLM
This chain passing allows multiple hooks to collaborate – each hook is responsible for different injection content, and they combine into a complete system prompt. If one hook throws an error, aptbot swallows the error, logs it to stderr, keeps the current context at the state after the last successful hook, and the chain continues executing.
Priority ascending: Each hook registers with a priority numeric field. Lower numbers execute first (ascending order). This lets users precisely control hook execution order.
1 | // priority 10 executes first |
If all hooks have the same priority, the execution order follows the registration order (first registered, first executed). But relying on “implicit order” is dangerous – it’s better to explicitly set priorities so the order is clear at a glance.
The design orientation of this execution model is “simplicity first“ – synchronous (no need to handle concurrency), mutate (no need to learn immutable data patterns), fixed priority (no need to design complex sorting strategies). Every decision chose the simplest option. The cost is that hooks cannot do heavy work, but the benefit is that hook behavior is predictable, easy to debug, and a beginner can understand it within an hour.
4.3 Two-Layer Plugin Directory: Workspace Overrides Builtin
The storage and loading approach for hooks is exactly the same as the Skills system, also in two layers:
Builtin hooks: Default hooks shipped with aptbot code. Written by project maintainers, providing common functionality – such as a basic logging hook, a default tool_after audit hook. After cloning aptbot, these hooks are already available.
Workspace hooks: Custom hooks in the user’s project local directory .aptbot/hooks/. Custom hooks written by users for their own projects. When loading, workspace hooks with the same name override their builtin counterparts.
The core problem solved by the two-layer loading is the same as in the Skills system: the conflict between out-of-the-box usability and project customization. Without builtin hooks, users clone an “empty” system and need to write hooks themselves for basic functionality. Without workspace hooks, users cannot customize builtin hook behavior and must accept the project defaults.
Sharing the same mechanism as the Skills system’s two-layer loading means users only need to learn the “two-layer override” pattern once to understand the loading logic for both hooks and skills. This is aptbot’s consistent design language across subsystems – Config, Memory, Skills, and Hooks all follow the convention of “builtin provides defaults / workspace provides overrides.”
4.4 Sandbox-Free Design Philosophy
aptbot’s hooks have no sandbox – hooks are ordinary TypeScript code that can directly import aptbot’s internal modules and access the file system, network, processes, and any other resources. If a hook is written incorrectly and causes the process to crash, that’s the user’s responsibility.
This is a deliberate design choice, based on the core assumption of “within the trust boundary“:
- Hooks are written by the user themselves: Users write hooks in their own workspace directory, not downloading and installing plugins from unknown sources on the internet. Users already have direct access to modify aptbot’s code, so writing hooks naturally follows – hooks have the same trust level as aptbot itself.
- Hooks don’t need permission isolation: Unlike browser plugins that need sandboxing (because plugin sources are untrusted), aptbot hooks are at the same trust layer as aptbot itself. Users trust their own code and don’t need OS-level isolation.
- Sandboxing would limit capabilities: If hooks run in a sandbox, their capabilities are severely restricted. Many valuable hooks would become impossible – for example, an
llm_beforehook that wants to read the current project’s.envfile to inject environment info. If the hook is in a sandbox without “read file” permission, this capability is lost.
The cost of no sandbox is that security responsibility falls on the user. Users are responsible for the hooks they write – a buggy hook could crash the agent, leak data, or execute dangerous operations. But aptbot provides one safety net: hook errors are swallowed, written to stderr, and do not affect the main flow. This gives users the confidence to write experimental hooks – if something goes wrong, they can fix it, and the agent keeps working.
This safety net is essential for the “sandbox-free philosophy.” Without it, a single hook error could bring down the entire agent. With it, users can confidently write and debug hooks, knowing that even if a hook isn’t perfect, it won’t affect the agent’s basic usability.
This forms an interesting contrast with Approach B’s “async event listening”: Approach B protects the main flow through async isolation (hooks run in an independent event loop; errors don’t affect the main flow). aptbot protects the main flow through “swallow errors + stderr.” Both approaches achieve the goal of “main flow is not affected by hook errors,” but the former limits hook capabilities (can’t synchronously modify main flow state), while the latter requires users to be responsible for hook quality.
4.5 Typical Use Cases
Typical application scenarios for the 8 hook points:
Logging (turn_before / turn_after): Record input and output at the start and end of each interaction round. Compared to the agent’s built-in logging system, hook logging is more flexible – users can customize the format, write to independent log files, or output to multiple destinations simultaneously.
Monitoring (llm_before / llm_after): Record token usage, request latency, and success/failure before and after each LLM call. This data can be reported to Prometheus, Datadog, or a simple statistics file. The agent loop itself doesn’t need to know about the monitoring system – monitoring is the hook’s responsibility.
Auditing (tool_before / tool_after): Record the parameters and return results of each tool call. For “high-risk” tools like bash, the audit hook can record “who, when, what command was called” in tool_before, and “the command’s exit code and output summary” in tool_after. This is especially important in multi-user shared agent scenarios.
Automatic steering injection (llm_before): Detect the current conversation context and automatically inject relevant guidance information. For example, if the conversation mentions “testing”-related keywords, automatically inject a “project testing conventions” paragraph. This is the foundation of “dynamic system prompts” – instead of cramming all possible info into a static system prompt, inject on demand for a leaner, more relevant context.
The common characteristic of these four scenarios: they are all “side actions” decoupled from the agent’s core loop. Implementing them as hooks rather than hardcoding them into the agent loop not only keeps the loop pure but also allows these side actions to evolve, configure, and start/stop independently.
5. Future Directions
5.1 Limited Async Support
aptbot’s current hook execution model is purely synchronous. This suffices for most scenarios, but some hooks are inherently asynchronous – for example, reporting monitoring metrics to a remote service. If the main flow waits synchronously for the HTTP request to complete, it slows down the entire agent loop.
One possible direction is introducing “annotated async”: hooks can declare themselves as “fire-and-forget” types, and aptbot won’t await their completion, letting them run in the background. This preserves the synchronous semantics of the hook chain (sequential execution, chain passing) while providing an async outlet for hooks that “don’t need to wait for results.”
5.2 Conditional Hook Execution
Currently, all hooks registered at an extension point execute. As the number of hooks grows, situations may arise where “99% of scenarios don’t need this hook, but it executes every time” – not common, but wasteful.
Conditional hook execution allows a hook to declare a “trigger condition” (predicate). aptbot checks the condition before invoking the hook and skips it if the condition isn’t met. This reduces unnecessary hook invocations while maintaining the reliability that “the hook will definitely trigger when needed.”
5.3 Optional Sandbox Mode
For scenarios involving “installing hooks from the community” (a marketplace or plugin ecosystem), the trust assumption changes – users no longer write their own hooks but download hooks written by others. In this case, the security risk of the sandbox-free design becomes apparent.
Long-term, aptbot may introduce an optional sandbox mode: not enabled by default (compatible with existing hooks), but available when users install hooks from the community. The sandbox mode would restrict the hook’s file system access, network access, process creation, and other capabilities. This is the “freedom first, security optional” path.
Summary
The Hook system is the “extension point mechanism” for the agent loop, decoupling side actions from the core loop and inserting them in a pluggable manner.
Conceptually: Hooks are a mechanism for inserting custom logic at key nodes in the main flow, complementing tools (action capability) and skills (usage knowledge). Building all side actions in leads to three problems: loop bloat, hard-to-disable, and limited customization.
Approach comparison: Approach A (no hook system) is simple but poorly extensible – all side actions intrude into the core loop. Approach B (async event listening) performs well but cannot guarantee order consistency between side actions and the core loop, and cannot modify or block the main flow. Approach C (sync hook chain injection) is most controllable but requires all hooks to be lightweight and fast.
aptbot’s design: 8 hook points covering the before/after of four layers (agent/turn/llm/tool), a natural convergence of the agent loop structure; synchronous execution + ctx mutate + priority ascending for simplicity and predictability; a two-layer plugin directory consistent with the skills system to reduce learning cost; a sandbox-free philosophy providing maximum flexibility under the “trust boundary” assumption, using “swallow errors + stderr” instead of isolation to protect the main flow.
With the Hook system design understood, the next article moves up a layer to look at Channel and multi-client access: once the agent loop is running, how to enable multiple clients to simultaneously connect to the same agent session.